How to import WireGuard VPN configuration on Linux (nmcli)
Introduction
So, you've just signed up for a VPN service, and they've provided you with a WireGuard configuration, or perhaps you've set up your own WireGuard VPN server and have the configuration ready. You're looking to import this configuration into your system without the hassle of third-party VPN clients. Fortunately, for Linux users, there's a streamlined way to achieve this using the NetworkManager's command-line interface, nmcli. This tool not only simplifies network management tasks but also supports importing WireGuard configurations directly, making your VPN setup quick and straightforward. In this blog post, we'll walk you through the process of importing your WireGuard VPN configuration using nmcli, ensuring you can establish a secure and private connection in no time.
Step 1: Ensure WireGuard is installed
First things first, let's make sure that WireGuard is installed on your Linux system. WireGuard can be easily installed through your distribution's package manager.
For Debian-based distributions like Ubuntu, you can use:
sudo apt update
sudo apt install wireguard
And for Fedora or CentOS, the command might look like:
sudo dnf install wireguard-tools
Step 2: Rename Your WireGuard Configuration File
Before proceeding with the import, it's essential to address a critical requirement of WireGuard on Linux: the configuration file name directly correlates with the network interface name, and there's a character limit for this name. To comply with this limitation and ensure smooth operation, rename your WireGuard configuration file to something concise, such as wg0.conf. This step isn't just a recommendation; it's mandatory to avoid issues with interface naming in WireGuard. Make sure your renamed configuration file is ready and located in an accessible directory for the upcoming import process.
mv your-vpn-config-name.conf wg0.conf
Step 3: Importing the Configuration with nmcli
With WireGuard installed and your configuration file prepared and possibly renamed to something like wg0.conf, you're ready to import it into NetworkManager using nmcli. The command for this is straightforward:
nmcli connection import type wireguard file /path/to/your/wg0.conf
Simply replace /path/to/your/wg0.conf with the actual path to your WireGuard configuration file. Executing this command will create a new network connection profile based on your WireGuard configuration, which can then be managed with nmcli to control your VPN connection easily.
Step 4: Activating the VPN
Now you can easily activate it from your NetworkManager toolbar.
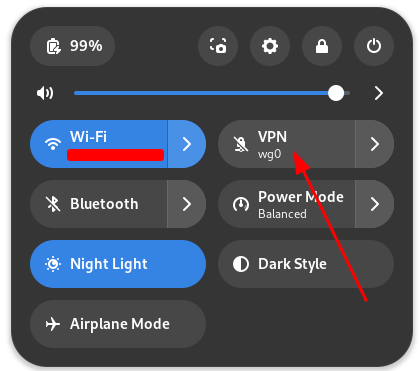
For example, in Fedora under Gnome, you can activate it like this